

The IV/35 Mongol Conquest 15mm DBA army is one that's been looming on the horizon for some time... I had planned not to do it actually, but with the Early Russians that I had bought for a Mongol expansion based campaign it was always a possibility. It finally came down to it with the second installment of the Samurai Night Fever tournament at Fallcon. The event supports all DBA armies with "Samurai", "Japanese", "Chinese", "Korean" and "Mongol" in their title, or are a vlid enemy of one of the above as long as they're east of the Urals... I had painted a Samurai army for the first Samurai Night Fever, but it was never my favourite place and time.
So it came to Mongolians. It was actually Sean, the fantastic gamer and good buddy of mine who is running the Samurai Night Fever event that got me into the Mongols. He posted a little video of a fantastic song by Ultan Urag, the musical group that did a lot of the music for the Mongol movie. That was enough of course... While I was painting the first batch of Mongolian light horse, I watched the Mongol movie, thinking it would be as spectacular as the music from Ultan Urag. Unfortunately it was not what I had hoped. It was a fine movie, no question about that. But it was Temugin's story that almost ended the project. All I saw was a guy who basically went crazy after having such and adverse life, who then went on to spread that adversity all over the world. There is a lot of reverance for crazy empire builders, but I am not sure why... In any case, I remembered that I was a mini gamer and all about the role-playing of evil empire builders, and so managed to continue with the project!
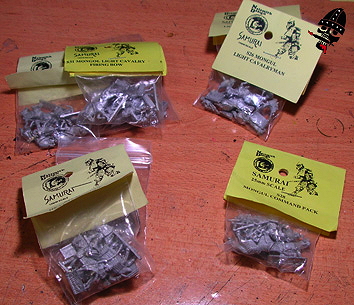
What pleasure it is to get a package full of the heavy little
packs filled with pewter miniatures!
It all started with an order to Navwar Miniatures. The old 15mm historical miniatures that they sell were all done by Mr. Naismith, who still sculpts to this day! His figures are fantastic, and Navwar has very affordable prices. The only set back really is the general lack of pose variation; the modernish need for variation wasn't so much a concern when these figures were sculpted. That being said, there's enough variance in the Mongol line for me, and off I went.
The one thing that I don't like about new figures is all of the flash and extra metal bits that have to be carefully removed. After looking at the packages and putting some thought into the project, I decided to paint up twelve figures, making up six elements of DBA light horse. I knew it would be a bit of an effort to get the first six elements done in one week, but I was bolstered by the speed with which my Patrician Roman 15mm DBA project went.
Choosing which figures to put onto the bases was quite simple; with only two poses for rider and horse, it would be one pose each for each element. I also decided to change the horse and rider combination for that bit of extra variance. So then it was on to preparing them for painting, which is gluing them together and then onto popcicle sticks.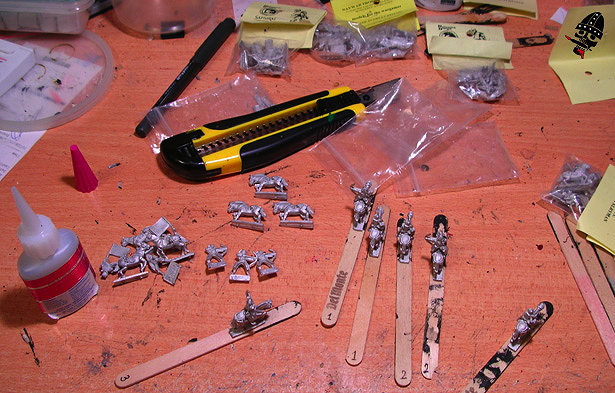
An image of the progress of putting the light horse figures onto sticks in preparation
for painting. It turns out to be a big part of painting miniatures!
I have found that it was a good idea to number the sticks, with each number denoting different elements. It's just too easy for me to mix up miniatures... Since I decide on paint schemes for each figure based on the schemes of the others that will share the element with them, it's trouble to mix them up. It's no fun to base everything up and then find out that the last two figures to be based are dressed in the same way... especially in armies like the Mongols, where they would not be regularly dressed.
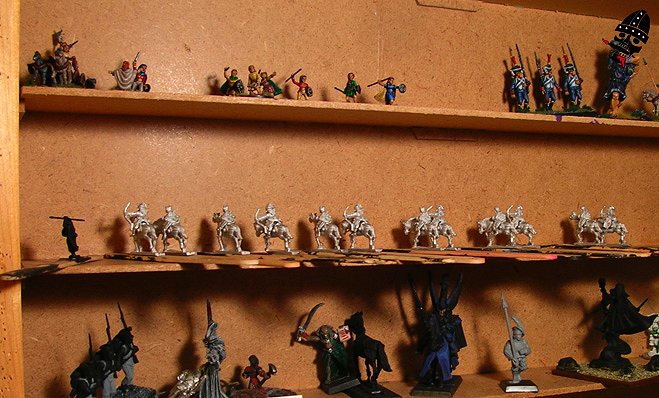
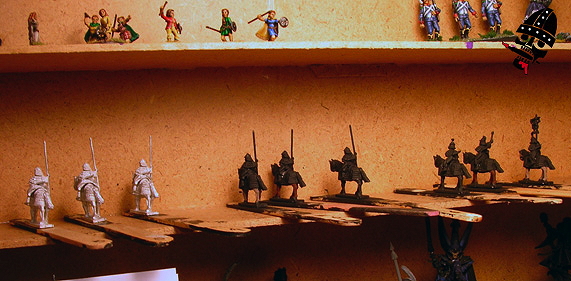
The figures all on sticks waiting for priming so they can be painted. The shelf above them
are those that are finished and have to be stored, while the shelf below has random figures
that might never get paint...
Once they're all on their sticks it's time for priming. I prime the figures with watery black paint and a paint brush; no spray for me! I typically go over the figures a second time to cover the metal that is inevitably still exposed after the first coat. After the priming I block in everything. That is, I paint the base coat of every colour on each figure! Basically, this is the process that anyone using the dip uses: the figure is painted with all of its colours, but no shades or highlights, and then dipped. I don't use dips though, so I typically block in all of the colours with the darkest variation, and then add highlights.

All of the figures with their base colours blocked out and ready for highlighting! The longest, most
tedious part of the painting for me is blocking out all of the colours. Once the colours are blocked
out, the highlighting goes quickly and the projects wraps up in what seems like a snap!
I know that some people will paint one colour, then highlight it and finish it while leaving the rest of the figure simply primed, but I have found this tends to waste time. The reason is that I end up deciding later to use more of the already finished colour on the fig, and so I have to go through the process of highlighting it again, when I could have done each colour only once for each figure... Some other hobbiests I've seen will split up their projects by the kit of the figures, such as doing all of the boots, then all of the cloaks, etc. But they end up doing black boots, green cloaks, and then black tunics and green leggings... The other benefit to blocking out the entire figure is that I basically finish the scheme for each figure before I start highlighting, which saves time if I decide to change the scheme and repaint a single colour on a figure...
Once the colours are all blocked out then I will start with a single colour and do all of the highlighting of that colour for all of the figures. Once the first colour is done, then the second and so on. I typically choose to do the colours that will most likely produce errors first. That is, colours that are in hard to get to spots on the figures. That way, if I accidentally paint outside of the lines, then when I come and highlight the surrounding area, the highlighting can be used to clean it up instead of having to fix it specifically.
So, after the first week, I finished six elements, made up of twelve figures... What would likely be a single battle group for the Field of Glory rules is half of the army for DBA! Next up for the project are the remaining light horse... or perhaps the camp... depends on my mood! See below for some examples of the blocked out figures beside images of their finished, highlighted versions!
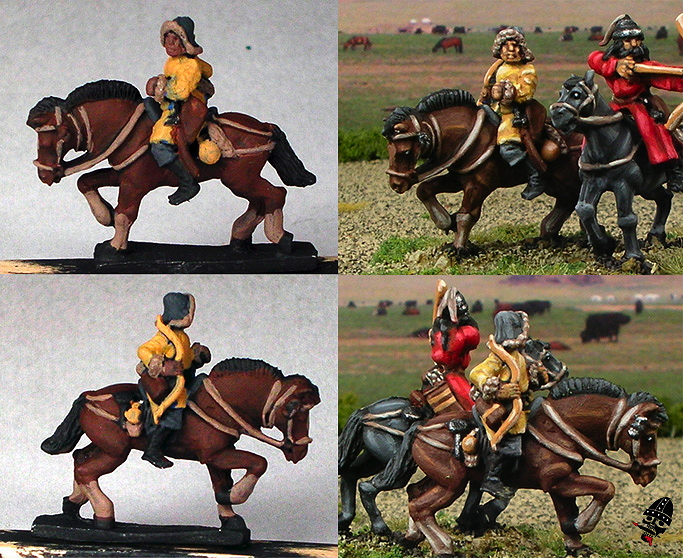
Blocked out on the left, finished on the right. Note that the Del (shirt) was once blue,
but I decided I had too much blue and so changed it to yellow! Good thing I hadn't
highlighted the blue already! In reality, there's not too much different between the two,
especially on the tabletop in 15mm!

Another example of a blocked-out figure compared to its finished self. Notice that I don't bother
putting the extra details on the blocked out version. Also, note on the tip of the horse-hair on
on the tip of the horse-hair on the helmet is raw, exposed metal on the blocked out figure as well
as the finished figure; it's tough to keep surfaces like that painted, and best to file them...
Over all though, I am happy with the outcome.
One thing that is worth pointing out in the painting process is the extra little details. The Mongols don't have many of them, but where they do, that detail is not painted on during the blocking out phase. The reason for this is that it look more natural to highlight tunics and quivers without having to paint around fiddly details. It's also a lot easier! Thus, the highlights go on first, and then the base coats for the details are added. In the above pictures you might notice it in the patterned del (shirt) and the arrow quivers. Once the base coat goes on, the details are then highlighted.
So, that's the first week of the project. It took a bit longer than I had hoped, and I am a bit worn out from painting so many figures in one group, but the army is half done! I'm happy with the progress so far and hope to continue the momentum into the coming week.
The week dawned with one strong feeling toward the project: no more painting horses for me! That's right, because I painted a couple too many figures and had to put in some extra late nights to finish them during the previous week, I needed a bit of a break. I took some time to assemble the rest of the six light horse figures, as well as six of the heavy cavalry figures. I also managed to get them onto popsicle sticks and prime them. I was hopeing that this would be enough to revive me from the light-horse burnout... But as I started to block out the figures in the base colours, I realized it wasn't enough.

This is a pretty standard scene with any DBA project; there's always droves of figures
based and primed on sticks ready for painting... I lost steam on these ones after blocking out
a couple of colours.
In situations like this I typically go to another project. I had some elves sitting around waiting for paint. A handful of Napoleonic erc French were staring at me as well. The problem with that was the timeline in which I needed to finish this army. Thankfully, in DBA there is an essential bit of camp terrain required for every army, which serves as a great distraction from the monotony of painting droves of the same figures all the time!

One of two Mongol Gers that I started. Note that yurt
is a turkic word for these tents, and so it's not the
word to use in the Mongol context! See the ger
construction article here.
Naturally there was some humming and hawing over what I should represent in the camp. In reality there's only two real options: a Mongol ger or a baggage train of Mongol riders and pack horses. The thing about the Mongol Conquest army that essentially made them successful was their lack of need for a supply train. Apparently every small group (five riders I do believe) were self sufficient because they had a couple of extra horses with some extra supplies and a ger between them. Furthermore, they could live off horses blood and mare's milk for up to sixteen days. As a consequence of this, baggage trains are kinda uninspired. A few little carts and herds, but not really any big, covered carts, only riders and baggage horses... I didn't really want to paint more horses, and I didn't really have any extra riders either.
Also, the Mongol ger, or yurt as it is commonly referred to, is a fantastic and obvious symbol of the nomadic Mongols. Once it was decided, I set to work. I typically work on this kind of terrain by first throwing together one and then applying what I'd learned on the first one to make a second one. That's sorta changed somewhat lately, as I will often start on one, get to a point, and then start on another. Essentially, I will be working on them at the same time, feeling my way along. To follow along with the construction of the Mongol ger, check out the ger construction article here.

Here I am gluing down the finished ger to it's mobile-home platform.
See the ger construction article here.
I really like building two at a time because I find that it helps me work through issues in design and implementation better. For this project, I couldn't figure out how to do the conical roof; I lack confidence in conical roofs for some reason... Anyway, I ended up hacking it to work properly. Once the basic design was in place I planned to do two large gers on your standard steppe looking platform and call it a good job. But then I remembered those crazy images of a ger on a large wooden platform with giant wheels. I had seen a few different versions of it; there was an illustration in an Osprey book that looked a lot like something out of a Dungeons and Dragons campaign guide and a painting that someone had done in an abstract way. It wasn't until I saw a picture of a re-production of the contraption that I began to take it seriosuly... I mean, it was a giant wooden platform on giant wheels pulled by hundreds of oxen... It was totally reminiscent of Grond, the giant battering ram from Mordor that smashed down the gates of Minas Tirith in Lord of the Rings.
It was also at this time that I saw a lot of parallels between Mordor, and the language of Mordor, and the Mongolian language. The word Mordor and Mongol are even similar. I am sure that Tolkien took some inspiration from the Mongol hordes for his dark armies... Easterlings being the obvious connection at least. But I digress.

Here is the image that clenched it for me... In the paintings and illustrations it was too
much to take seriously... But in the flesh it looks perfectly reasonable ;)
So, it was after both basic structures had been built that I decided to do one on a mobile-home platform. Just one because I only had four suitable wheels on hand and I was too lazy to put together some wheels from scratch; wheels are very fiddly! They went together pretty quickly after the basic structure was done. I added a few details here and there and then fixed them to their bases.

I find that typically when you're half way through painting
anything, it looks absolutely terrible.
Painting is a great part of terrain building because it's a lot easier than painting miniatures for the most part. Often you can rely on the texture of the model to give you detail, unlike on figures. As a consequence I typically put down a thick base coat and then do a couple of highlights by successive dry brushing. Of course there's also the detail step... It makes a model look hundreds of times better if it has some nice detail on it.
For this project I decided to do a banner out in front of the ger as well as an ornately detailed door. I couldn't convince myself to paint patterns on the fabric... Although now looking at the reporduction of the mobile-home ger in the above picture, I wish I had. This is the point where I decide to go back and fix up the model! But for now, it's just the door and the banner.

A close up on some of the detail on the first finished ger.
I find banners pretty easy, and they add a lot to the look of anything really. Also, there are great examples of doors and banners for ornately decorated gers all over the internet. So, I painted them up. Basing was done in the same way as the light horse elements that I had already finished and went smoothly.
It is worth noting here that I made a choice with these camps based on DBA rules for their layout. Typically I would leave enough room on the base to put a DBA element on there to fortify the camp. For this army however, I only did the light horse and cavalry options. In DBA, light horse and cavalry can't really fortify a camp. If you put a cavalry element into a camp, it would fight at +3, which is the default for a non-fortified camp. Thus, I didn't go out of my way to leave room for a 40mm by 30mm base element that would do better outside of the camp (because it could move and recoil). So yes, I took full advantage of the surface area of the camp with the terrain, as a consequence it's almost perfectly to scale.

A close up of the detail
on one of the riders.
After completing the two camps I decided to get to work on the last three elements of riders after all. The burnout was done, the Mongol music was blaring and since I had already painted 12 of the riders, I had the scheme down well enough to finish the six figures in a few, maybe five hours from start to finish.
After the figures are all painted, and all of the base coats are highlighted up, it's time for the details. Sometimes this comes as a surprise to me... As I finish the figures I feel this relief and happiness, then I realize I didn't finish the details yet. Sometimes I don't bother, but most of the time I muster enough energy to get at least some on there. With these last few horse elements, I didn't realize that I had forgotten the detail until the figures were on their bases. I decided not to do any more patterned dels (tunic-shirt deals that the Mongols wear), but I did do a couple of designs on the arrow quivers.
Details go pretty quickly because they don't require a large volume of painting. Of course, if you are out of practice you might spend a lot of time trying to get lines straight, or fixing mistakes, but if you are well practiced, having just finished painting similar details on 12 similar figures, it's only about 10 minutes from start to finish!

I always base at the end. Here the elements are all assembled and the bases are
waiting for paint.
After the second week the army is 3/4 of the way done, and I have not one but two perfectly good camps for it! All that is left to do are the three heavy cavalry elements, which include the general. The cavalry elements represent the wealthy nobility, and will be a litte more colourful as a consequence.... Also better armoured. As for the extra camp, I typically sell them. This time though, I think I will donate it to Sean at Teesnage Visigoth as a thanks for putting on the very event that I am painting the Mongols for... That is, if he wants it...
To have a look at the latest three elements of the project, check out the 15mm Mongol army gallery. To see more than a few pictures of both Mongol ger camps, check out the 15mm DBA terrain gallery.
The final week of the project started and I was tired. So many horses, so little sleep! Still, I was intent on finishing the mere nine cavalry figures that were required to finish the army. During the previous week I had actually gotten the jump on six of the nine figures by assembling, putting on popsicle sticks, and priming them the same time I primed the previous six light horse that I had done. In fact, I also blocked out the horses for some of the heavy cavalry figures as well, so I figured I was well on my way and that it would be a breeze.
Here you can see that six of the nine are primed and even have some base coats applied. The
raw metal figs on the left are waiting for the cyano glue to cure before they get the primer.
I kicked myself for not assembling and primining that last element of heavy cavalry last week, because it did set me back by perhaps a day, since I had to first let the cyano glue (commonly known as super glue) dry and then the primer dry before I could start painting those with the rest of them. It's really important to make sure the cyano glue is cured before you apply paint, unless you don't mind sacrificing a brush for that extra hour of painting time! Brushes that have cured cyano in them rarely live to tell the tale...
Despite the set back, I still had them all blocked out by Tuesday the 24th for the most part. The one issues was that since I hadn't done any heavy cavalry, I kept having to go back and add little bits of detail here and there as I went: some more yellow edges to the body armour of the riders, red on a couple of the rider's aventails, etc. I figured it would be a breeze since they were all blocked out so early in the week!

The Mongol general Genghis Khan himself and his ruling elite well on their way to being blocked out.
The error in my assumption became quite apparent however when I started highlighting. It took me back to the Islamic Persian DBA project that I had done this time last year... That project took me a full five weeks to finish thanks to the droves of barded horses. Barding very similar to the Mongol barding found on these heavy cavalry... The process of painting what seemed to be thousands of little tics on all of the barding and body armour quickly became insanely monotonous. I had to sit myself down a couple of times and make myself realize that I was painting a handful of 15mm cavalry and not raking my naked body over broken glass... Still, with motivation falling off, so did productivity.
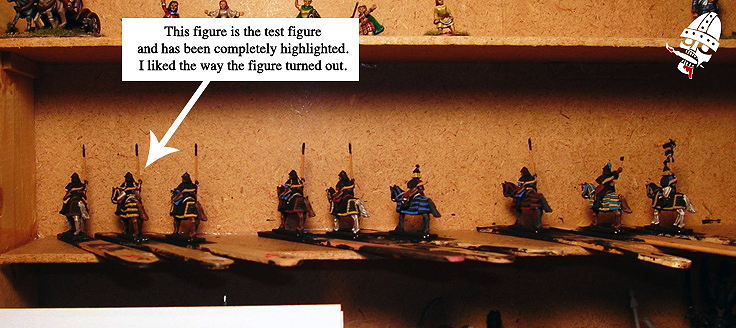
After all of the blocking out was done, I had to get around to finishing a single figure to
see how the whole collection would look in the end... This time I was happy with it!
As a way to break the monotony I decided to finish a couple figures completely out of band just as test figures. Basically it was a way to see how much highlighting I didn't have to do in order to speed things up. I found that I had to stick with a base plus three highlights for red, and a base with two highlights for all the other colours. But that for black, I could get away with a single highlight. Interestingly, too many highlights on the black reduced the contrast between the black and the colour, making it look terrible! That was nice, especially since there was more black than any other colour ;)

The finished Mongol horde! Beware all other Asian armies, the wrath of the khan is upon you!
After the couple of test figures were done, the rest of the figures went pretty quickly, and before I know it (Sunday August 29th at about 12:30am) I was done! I put the figures on their bases and had to let the cyano glue cure before I could glue on the sand and ballast. By Sunday night I was finishing off the bases and the army was done. Pictures Monday morning before the sun was up and blamo, project finished! Another DBA army down! At the time of finishing, only two more unpainted 15mm DBA armies to go! Check out the entire army gallery in the Mongol Conquest Army Showcase article or in their 15mm Mongol Conquest gallery.